It’s day 7 of your first incubation. You’re standing in a darkened room, heart racing, as you press a small light against a warm egg. Suddenly—there it is. A tiny dark spot surrounded by delicate, spider-like veins. There’s life in there.
That’s the magic of egg candling. Instead of three weeks of anxious waiting and wondering, you get to peek inside and actually watch your chicks develop.
You’ll spot problems early, make adjustments along the way, and witness one of nature’s most remarkable transformations firsthand.
Whether you’re nervously checking your first incubator setup or looking to improve your hatch rates, this guide will walk you through everything you need to master the art and science of candling.
What Is Egg Candling and Why Does It Matter?
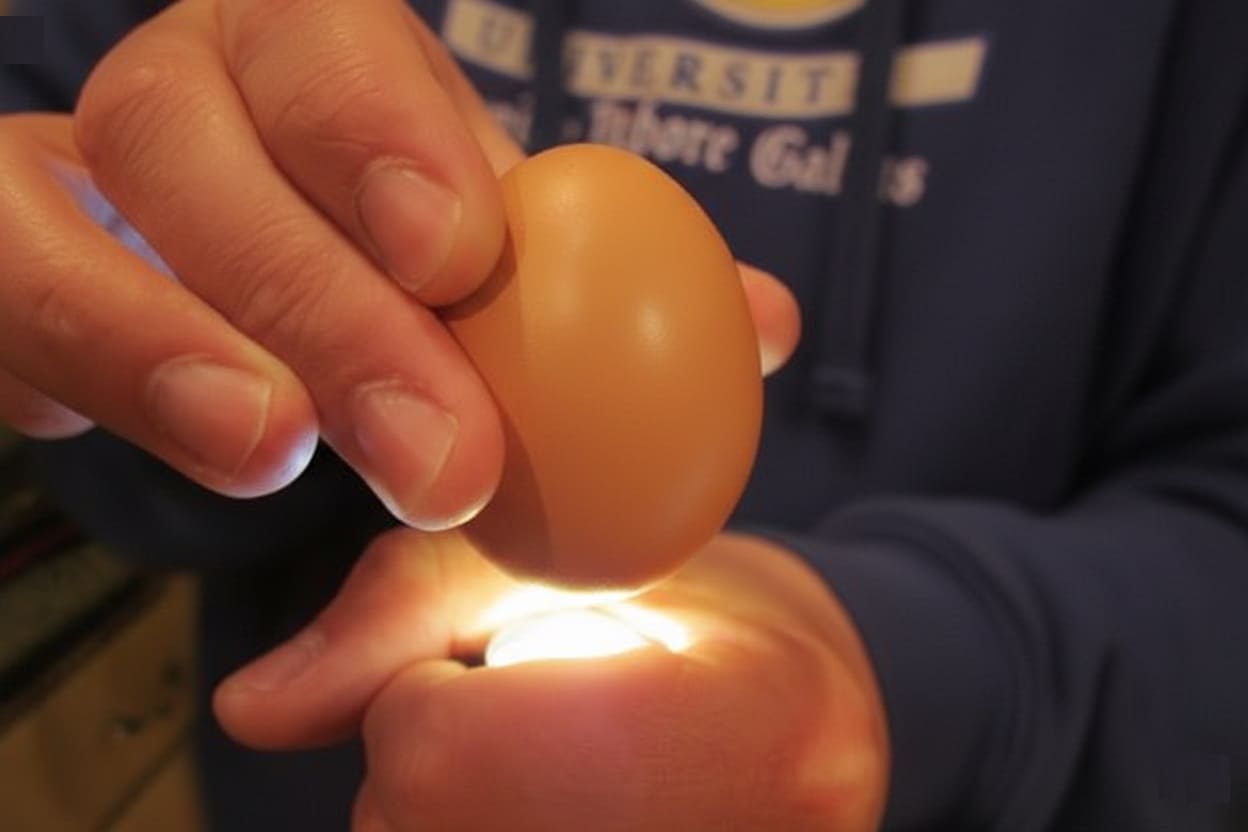
Candling is simply shining a bright light through an egg to see what’s developing inside. The name comes from the old practice of using actual candles, though we have much better (and safer) options today.
Think of candling as your quality control system. Here’s what it accomplishes:
1. Identifies infertile eggs within the first week so you’re not wasting incubator space and electricity on eggs that will never hatch. These “yolkers” remain clear with no development visible.
2. Removes deceased embryos before they rot and potentially explode. When embryos die during incubation (called “quitters”), they can contaminate healthy eggs with harmful bacteria. A rotten egg explosion is exactly as horrible as it sounds.
3. Monitors proper development by letting you track blood vessel formation, embryo growth, and movement. You’ll know your chicks are progressing on schedule.
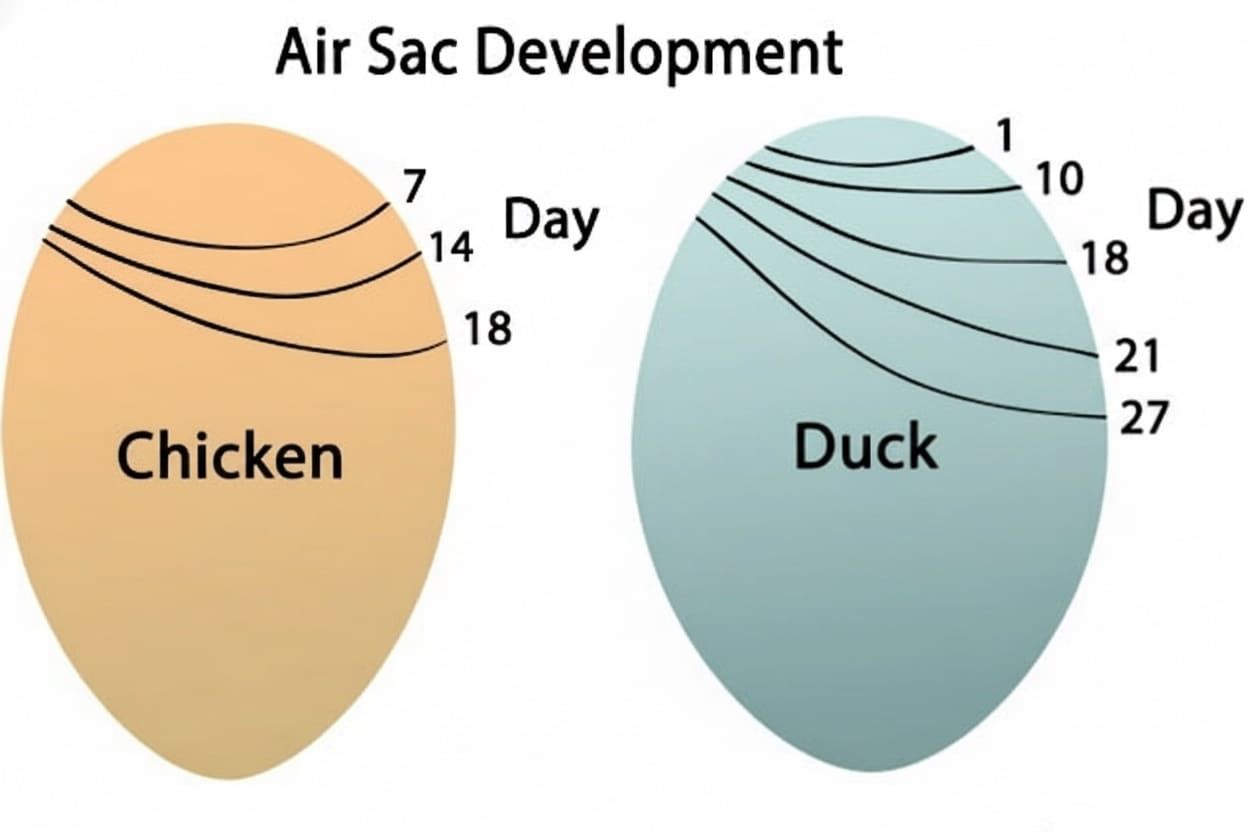
4. Confirms correct humidity levels through air cell observation. The air sac at the blunt end of the egg should grow steadily as moisture evaporates. Too little growth means humidity is too high; too much means it’s too low.
Getting this right can be the difference between chicks that hatch easily and those that drown or get shrink-wrapped in their shells.
5. Provides valuable data for improving future hatches. By tracking what you observe, you’ll identify patterns and refine your technique over time.
When to Candle: Strategic Timing Matters
Timing your candling sessions strategically balances monitoring with minimal disruption.
Day 7: First Candling
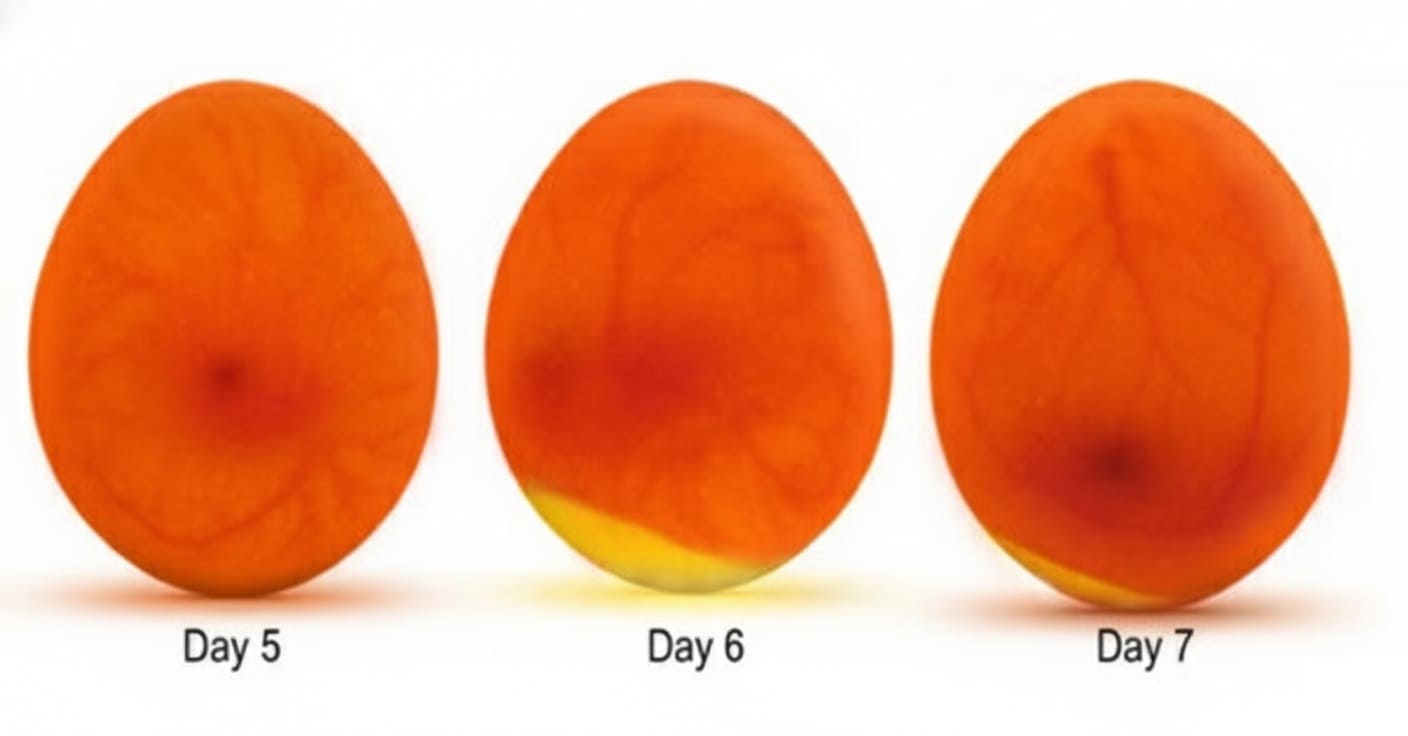
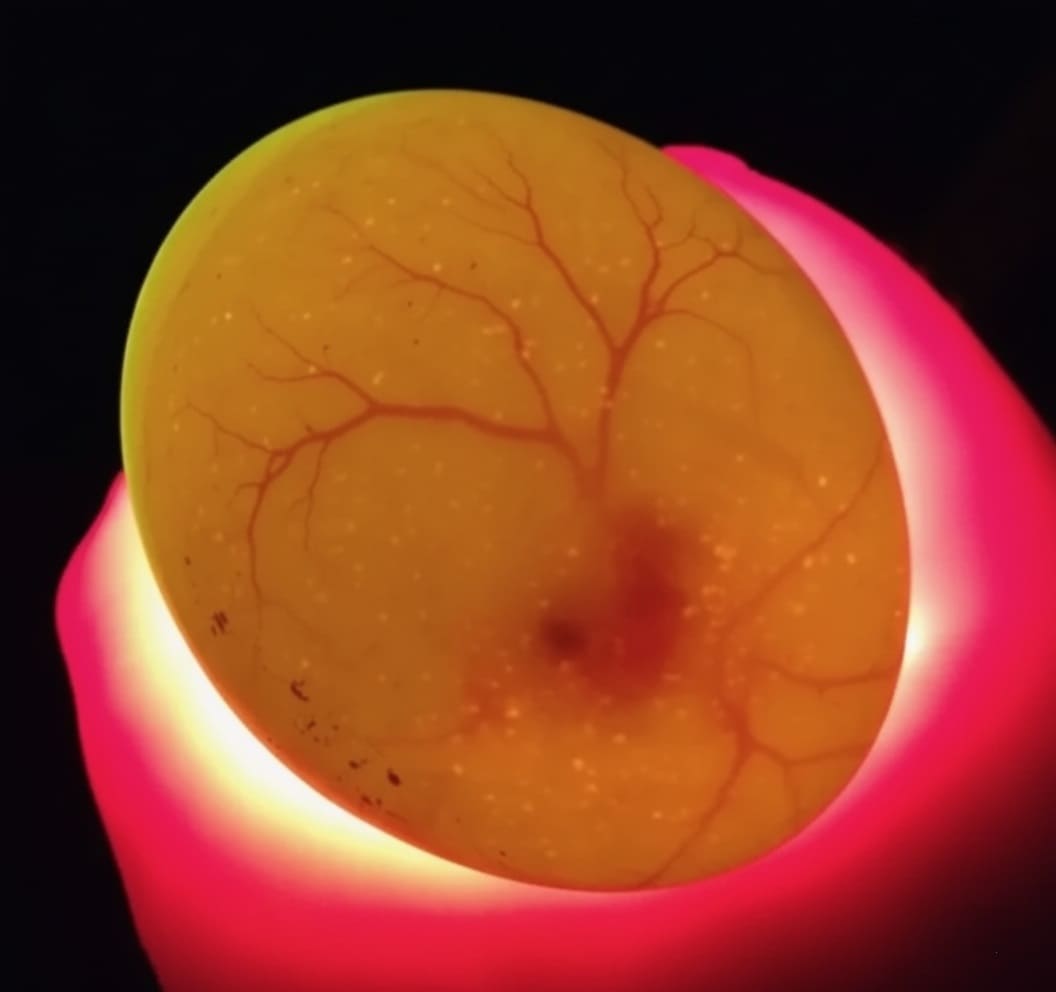
This is your first real glimpse of life. By day seven, fertile eggs display a small dark spot (the embryo) with a delicate web of blood vessels radiating outward like branches.
The pattern genuinely resembles a spider, which is why experienced hatchers call this the “spider stage.”
Clear eggs with zero development should be removed immediately. If you see a distinct, thin red ring inside the shell, that’s a blood ring indicating early embryonic death—remove these as well.
If you’re uncertain about an egg, mark it with a question mark in pencil and give it until day 10 or 14 to show clearer signs.
Day 14: Progress Check
By two weeks, viable embryos should fill roughly half to two-thirds of the egg’s interior, appearing as a large dark mass with prominent blood vessels. This is your opportunity to double-check questionable eggs from day seven and make final humidity adjustments.
This candling also lets you verify the air cell is developing properly—it should be noticeably larger than at day seven but not excessive.
Day 18: Final Check (Optional)
Many experienced hatchers skip this session since the egg appears almost completely dark by now, with little visible beyond the air cell.
If you do candle on day eighteen, you’re mainly confirming the air cell has reached appropriate size (roughly 30% of the egg’s volume) and that nothing has gone catastrophically wrong.
- Critical: Never candle after day 18.
From day 19 through hatch, chicks are positioning themselves for the exit and require stable, undisturbed conditions with elevated humidity. Opening the incubator during this period can cause shrink-wrapping and failed hatches.
Essential Equipment and Setup
Your Light Source
While a basic flashlight might seem adequate, a proper egg candler transforms the experience.
Quality candlers feature bright LED lights with openings that create a tight seal around the egg, directing all illumination exactly where you need it without light bleeding around the edges.
Commercial egg candlers cost $10-$30 and are worth every penny. If you prefer DIY, use a bright LED flashlight (minimum 100 lumens, preferably 200+), a small cardboard box, and create an opening slightly smaller than your egg’s diameter.
The key is that focused seal. Without it, ambient light washes out the subtle details you’re trying to observe.
Creating Complete Darkness
This cannot be overstated—you need genuine darkness. During daylight hours, drawn blinds aren’t enough. Wait until evening, or use heavy curtains to block every trace of light.
Even a small amount of ambient light can make the difference between clearly seeing blood vessels and seeing nothing but a murky shadow.
Your Work Surface
Always candle over a soft towel or blanket. If you accidentally drop an egg (and it happens to everyone eventually), you want it landing on something cushioned rather than a hard table.
Set up near your incubator to minimize the time eggs spend at room temperature. Every minute outside the incubator means slight cooling, which can slow development.
Record Keeping
Number each egg with a pencil before incubation begins. Never use markers—the ink can penetrate the porous shell.
Create a simple chart tracking each egg’s status at every candling session. This documentation helps you spot patterns and improve your process over time.
How to Candle: Step-by-Step Process
Preparation
Wash and thoroughly dry your hands—oils and bacteria from your skin can clog the egg’s pores or cause contamination. Set up your candler in your darkened space, with eggs positioned within easy reach.
Work Efficiently
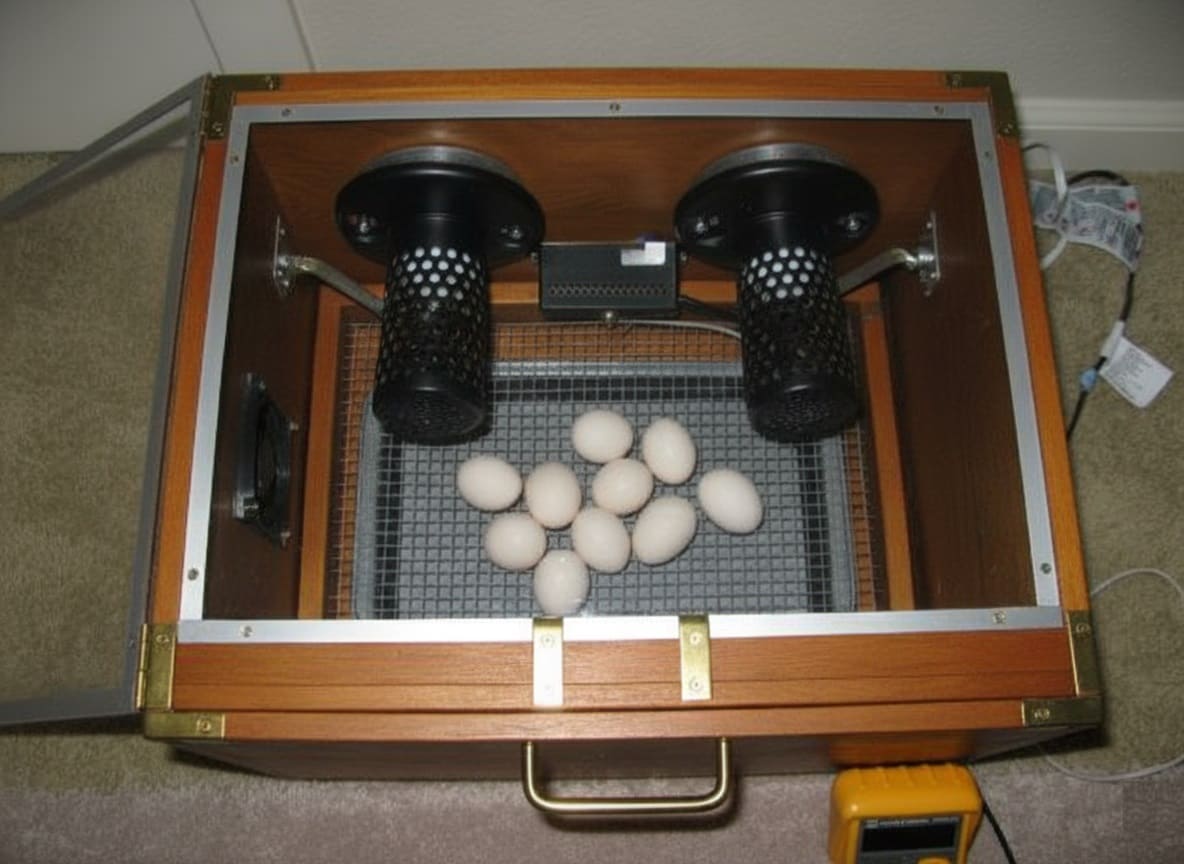
Open your incubator and work methodically through your eggs. Aim to keep the lid off for no more than 10 minutes total.
If you have many eggs, work in batches—it’s better to take two 10-minute sessions with a break in between than to keep eggs cooling for 20+ minutes straight.
 Here’s Everything You Need to Know About Incubating Chicken Eggs
Proper Positioning
Hold the egg with the blunt end (where the air cell develops) against the light source, tilted at a slight angle. This positioning provides the clearest interior view.
Gently rotate the egg until you achieve optimal illumination, but avoid excessive movement or shaking, especially during the first week when blood vessels are most fragile.
Observe Carefully
Take time with each egg. What appears murky initially often becomes clearer as your eyes adjust to what you’re seeing.
Look for blood vessels, the dark embryo spot, air cell definition, and any signs of problems like blood rings or murky contents that slosh when tilted.

Make Decisions
Return viable eggs promptly to the incubator. Remove obvious clears, blood rings, or non-viable eggs. When uncertain, mark the egg and recheck in three to four days—it’s always better to give a slow developer extra time than to accidentally discard a viable egg.
Understanding What You See: Day-by-Day Development
Days 1-4: The Invisible Beginning
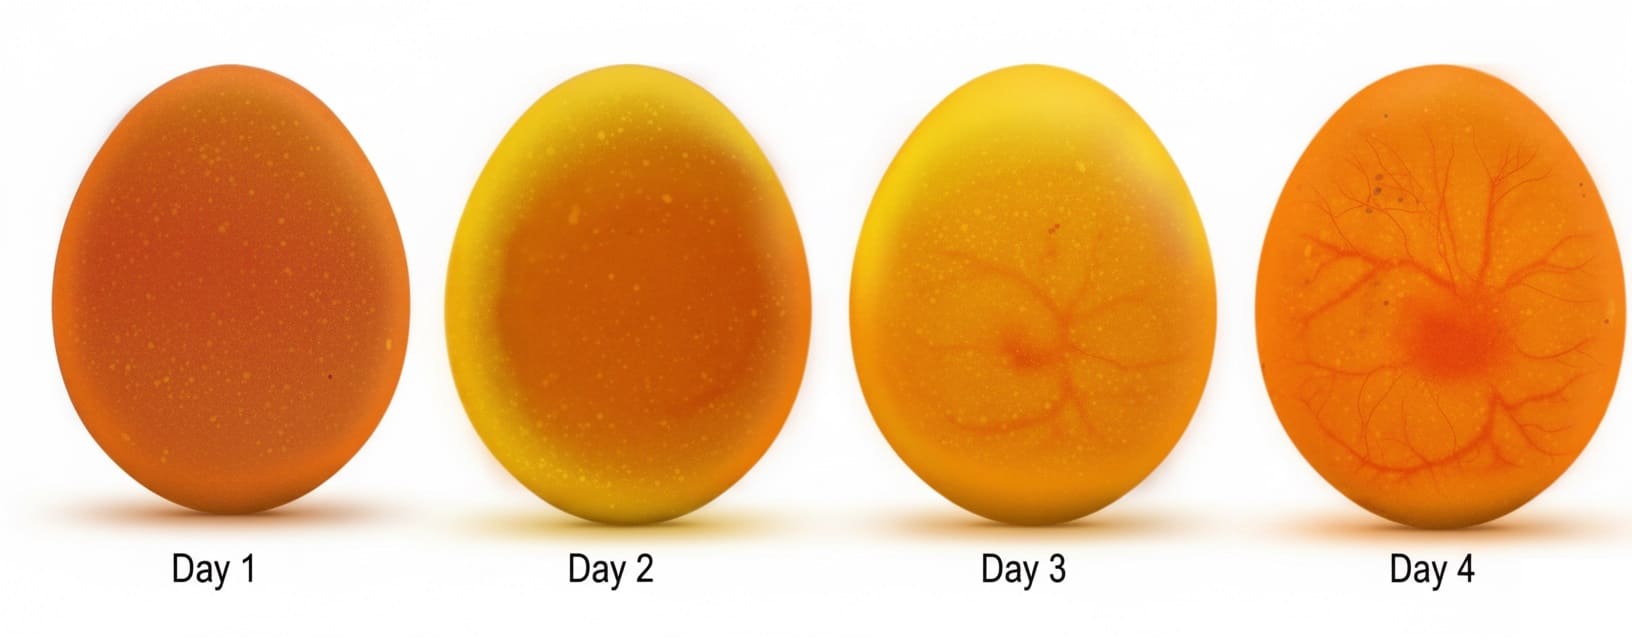
During these earliest days, you won’t see much through the shell—the egg appears mostly clear with just the yolk casting a faint shadow. Don’t let the lack of visible activity fool you, though. Incredible transformation is happening at the cellular level.
By day two, the heart has formed and begun beating at about 160 beats per minute. By day three, the first signs of blood vessels may become faintly visible in very light-colored eggs with excellent candlers.
Days 5-7: Life Appears
This is when candling becomes truly exciting. A small dark spot appears with delicate veins spreading outward in that characteristic spider pattern. The embryo’s eye develops as an especially prominent dark spot—proportionally huge for the tiny developing chick.
With patience and a quality candler, you might even detect the heartbeat as a subtle rhythmic pulsing in the blood vessels.
The air cell at the blunt end becomes clearly defined and should measure roughly 3-4mm deep for chicken eggs.
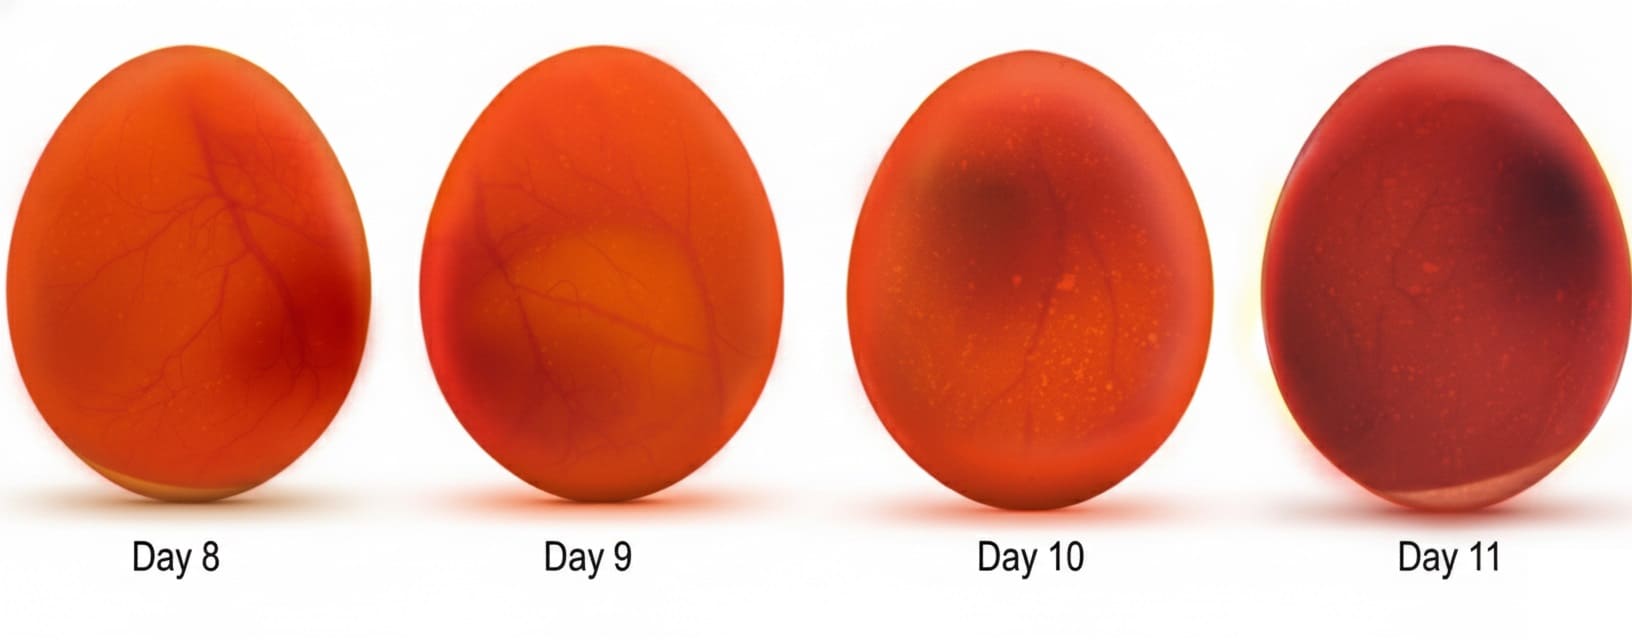
Days 8-11: Accelerating Growth
The embryo enlarges noticeably, now taking up about one-third of the egg’s interior. The blood vessel network becomes more extensive and easier to observe.
Movement begins—if you watch carefully, you’ll see the embryo wiggle in response to the light and warmth of the candler. This is often when candling becomes addictive; seeing that little life move is absolutely thrilling.
The air cell continues expanding as moisture evaporates through the shell’s pores—it should be 6-8mm deep by now if humidity is correct.
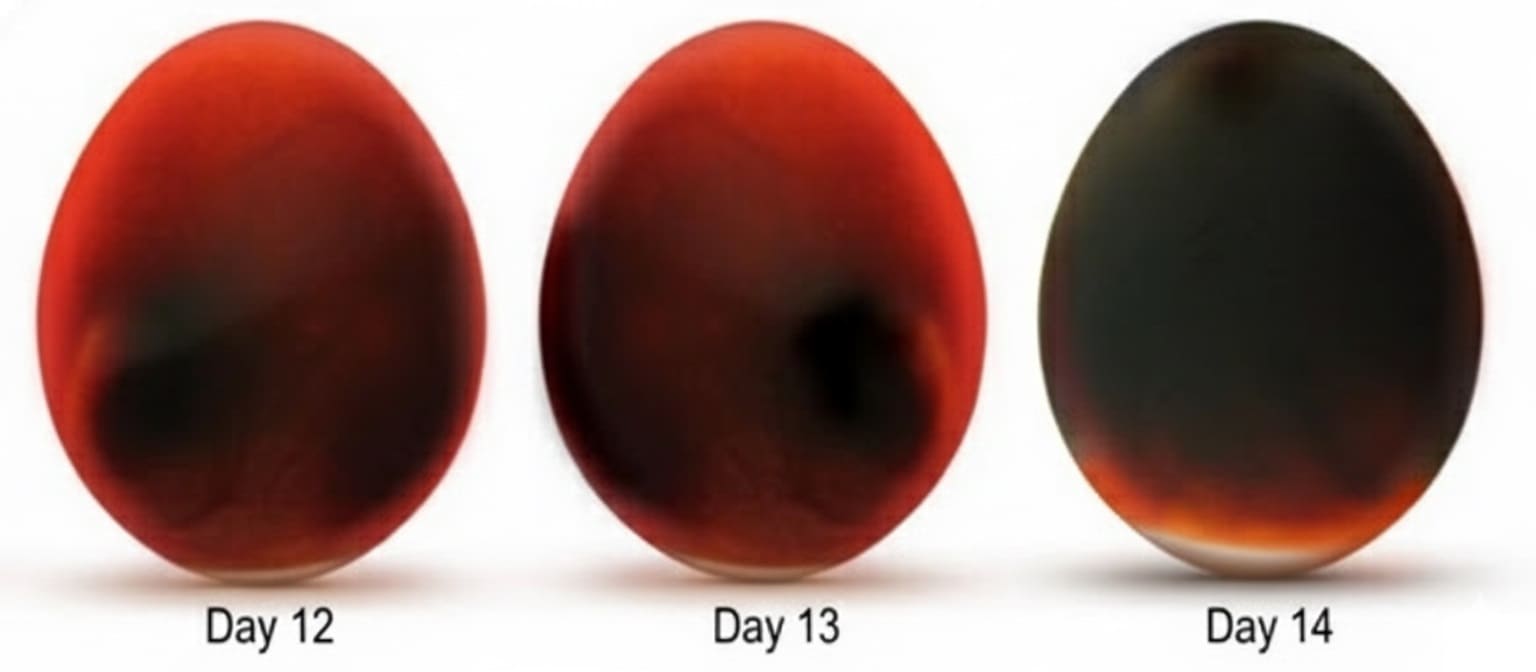
Days 12-14: Filling the Space
By the two-week mark, the embryo fills roughly half to two-thirds of the egg’s volume. The blood vessel network is prominent and well-developed. Movement becomes more obvious and frequent.
The chick is now developing recognizable features—wings, legs, a beak, and the beginnings of feathers.
The air cell should measure approximately 9-10mm deep. If it’s significantly smaller, your humidity is too high. If it’s noticeably larger, humidity is too low, and you need to make adjustments now before it’s too late.
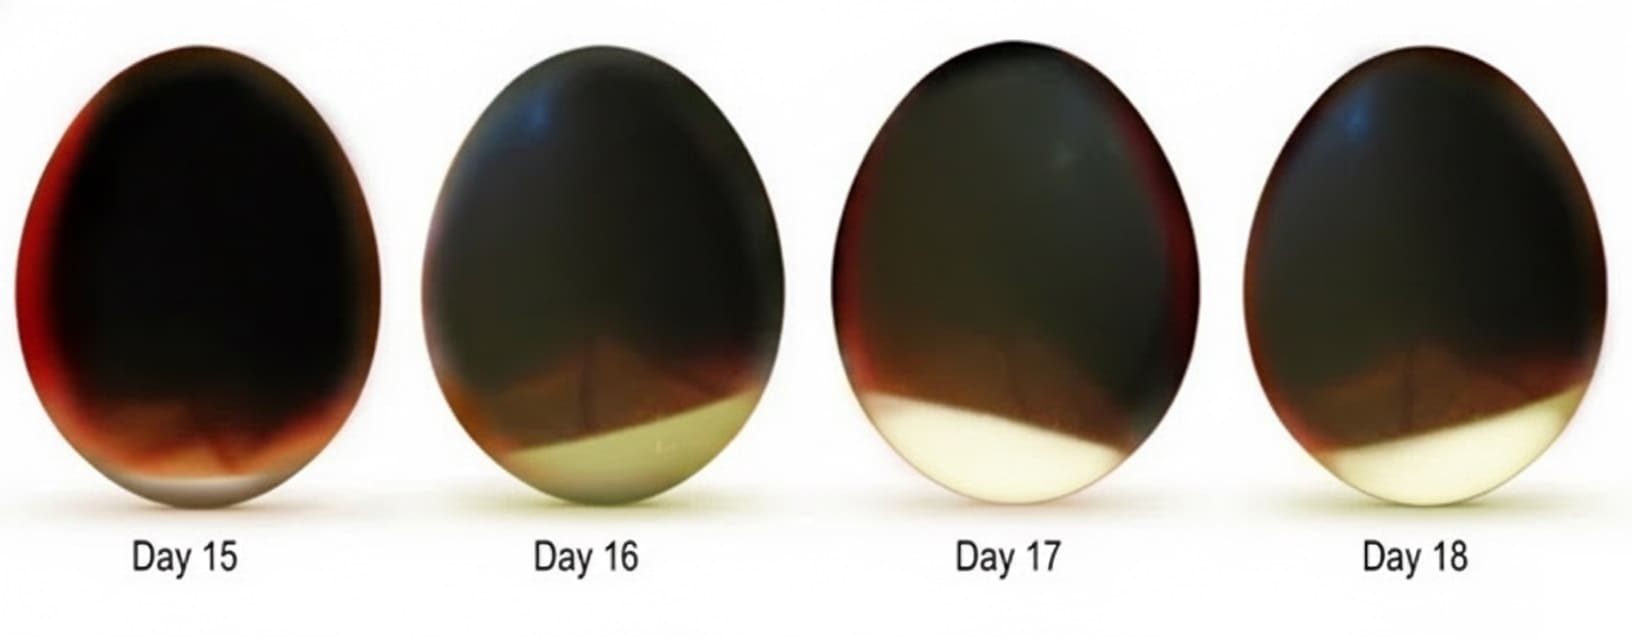
Days 15-18: The Final Preparations
The egg appears increasingly dark as the growing chick fills more space. You’ll see less interior detail—mainly just a large dark mass with the air cell visible at the top.
Movement may decrease simply because the chick has less room to wiggle around. This is completely normal and not cause for alarm.
The chick is busy absorbing the remaining yolk (its food supply for hatching and the first day of life), growing its final feathers, and preparing for the enormous effort ahead.
By day 18, the air cell should occupy roughly 30% of the egg’s volume, measuring about 13-15mm deep.
Days 19-21: Hatching Time
You should not be candling during these critical final days. The chick is positioning itself with its head tucked under its right wing, beak pointed toward the air cell.
Around day 19 or 20, you’ll hear chirping as the chick pips into the air cell and takes its first breath—one of the most magical sounds you’ll ever hear.
Within hours of that internal pip, you’ll see the external pip as the chick breaks through the shell. From there, the chick will rest before beginning the exhausting process of zipping around the egg and pushing its way free.
 Here’s How to Raise Baby Chicks Successfully: Week-by-Week Care Guide for Beginners
Reading the Signs: Healthy Development vs. Problems
Healthy, Developing Eggs Show
A clear network of blood vessels spreading from a central dark spot, with vessels appearing bright red and well-defined rather than murky.
Steady embryo growth between candling sessions, with the dark mass becoming progressively larger. A gradually enlarging air cell that grows at a consistent rate.
Visible movement starting around day eight, typically in response to the light or warmth of the candler. An increasingly dark interior as incubation progresses, which is the chick filling more space.
Clear Eggs (Infertile) Appear
Completely transparent except for the yolk, which appears as a simple shadowy circle. No blood vessels, no dark spots, no development whatsoever. The egg looks essentially identical on day seven as it did before incubation.
These should be removed to free up valuable incubator space and prevent any possibility of later bacterial contamination.
Quitters (Deceased Embryos) Display
A well-defined blood ring—a thin, distinct red circle visible inside the shell where blood vessels have detached from the dead embryo and pulled back against the shell membrane.
Dark streaks or scattered patches that don’t resemble organized development. Murky contents that may appear to slosh or move when you tilt the egg, indicating breakdown of the embryo.
Complete absence of movement when you would normally expect to see it at that developmental stage. A dark mass that’s significantly smaller compared to other eggs at the same incubation day.
Any eggs showing these signs should be removed immediately. Place them in a sealed plastic bag before disposal to contain any potential smell.
What to Do with Removed Eggs
If you’re curious and willing to deal with the smell, you can carefully crack open removed eggs to learn what went wrong.
Early quitters might show a small embryo with no further development. Later deaths might reveal a more developed chick. This can help you troubleshoot incubation problems.
However, do this outdoors or in a well-ventilated area—decomposing eggs smell absolutely foul. Alternatively, simply dispose of them immediately in an outdoor trash can.
 Discover 5 Surprising Ways to Use Eggshells in Your Garden
Eggs That Deserve a Second Look
Sometimes you’ll encounter eggs that don’t clearly fit “developing” or “not developing” categories. Perhaps you see faint veining but can’t quite make out the embryo.
Maybe the development seems present but less pronounced than other eggs. The air cell might look oddly positioned or shaped.
These questionable eggs deserve patience. Mark them clearly with a question mark and the date, then recheck in three to four days.
Development rates naturally vary somewhat, and what appears unclear on day seven might show obvious progress by day ten. A late-developing chick is far better than an accidentally discarded viable egg.
Troubleshooting Common Candling Challenges
“I Can’t See Anything in These Dark Eggs!”
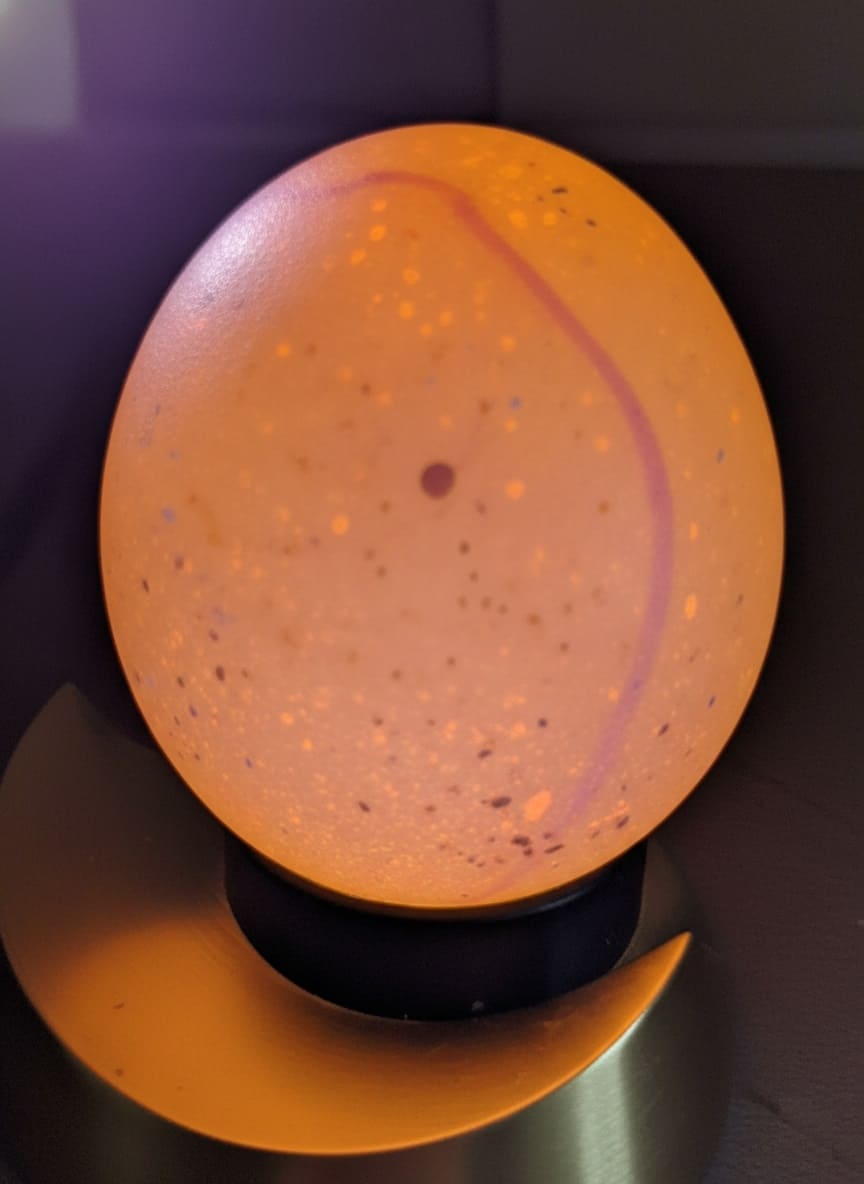
Brown and dark-speckled eggs present real challenges. Breeds like Marans, Welsummers, and Penedesencas lay eggs with shells so dark that even the best candlers struggle to penetrate them. Some olive egger eggs are nearly opaque.
Practical solutions:
Use the absolute brightest candler you can find—this is where investing in a high-quality 200+ lumen LED candler pays off. Ensure your room is completely pitch black, not just dim.
Try different angles—sometimes tilting the egg just slightly differently reveals details that were invisible head-on. Focus on the air cell first, as it’s usually easier to see than embryo details in dark eggs.
When candling remains impossible despite your best efforts, rely on other indicators. Does the egg feel slightly heavier than at the start of incubation, indicating the embryo is growing? (Fertile developing eggs gain weight before they start losing moisture.)
Most importantly, use your nose—hold each egg individually to your nostril and sniff. A bad egg emits a distinctly sour, sulfurous smell that’s unmistakable. If it smells normal, leave it in the incubator even if you can’t see inside.
 Discover 23 Chickens That Lay Blue Eggs: Breeds, Care & Production Guide
“My Air Cell Looks Wrong”
The air cell should develop at the blunt end of the egg and grow steadily as moisture evaporates. Chicken eggs should lose approximately 13-15% of their weight by hatching time, which translates to that 30% air cell by day 18.
- If the air cell is too large:
Your eggs are losing moisture too quickly. Humidity is too low—target 40-50% during days 1-18 for most chicken eggs (though some sources recommend lower for certain breeds).
Add water to your incubator’s reservoir. If it’s already full, partially cover a vent hole to reduce airflow and retain more moisture.
- If the air cell is too small:
Eggs aren’t losing enough moisture. Humidity is too high. Remove some water from the reservoir, or open vents to increase air circulation and moisture evaporation. This is critical to address by day 14, as insufficient moisture loss can cause hatching problems.
- If the air cell developed in the wrong location:
Occasionally, the air cell forms at the pointy end or along the side rather than at the blunt end. This usually happens due to improper egg positioning during storage or early incubation.
If you catch this during candling, carefully reposition the egg so the air cell is at the top. These eggs have reduced hatch probability, but don’t automatically discard them—some do successfully hatch.
“I’m Seeing Confusing Shadows and Spots”
Learning to interpret what you’re seeing takes practice. Blood rings are usually quite distinct—a clean, well-defined circular red line.
However, early quitters might show less obvious irregular dark patches. A large blood vessel positioned close to the shell can cast shadows that initially appear concerning.
Single blood spots (small dots) in otherwise clear eggs are usually harmless remnants from ovulation and don’t indicate problems.
The key difference: healthy blood vessels radiate outward from the embryo in an organized, branching pattern and remain attached.
Problem indicators like blood rings form complete circles, and dead embryo blood vessels appear as random streaks or broken-down patches rather than an intact network.
When genuinely uncertain, time is your friend. Mark the questionable egg and recheck in three to four days. Real problems typically become more obvious, while healthy embryos continue showing clear development.
“How Long Can Eggs Safely Be Outside the Incubator?”
Brief candling sessions won’t harm your eggs. A broody hen routinely leaves her nest for 15-20 minutes daily to eat, drink, and relieve herself, and her eggs hatch just fine. However, extended cooling does slow development and can reduce hatch rates.
Aim to complete your candling within 10 minutes with the incubator lid off. Up to 15-20 minutes is generally safe. Thirty minutes is the absolute maximum before you risk developmental delays or losses.
If you have many eggs to check, work in batches—candle half your eggs, close the incubator to let them warm back up, then do the second batch after an hour.
“The Candler Gets Hot—Will It Hurt the Eggs?”
LED candlers produce minimal heat compared to old incandescent bulbs, but they do warm up with extended use. Avoid holding the candler against any single egg for more than 30-45 seconds at a time. That’s plenty of time to observe what you need to see.
If your candler becomes uncomfortably hot to touch, give it a short break to cool down before continuing.
Special Situations That Require Adjusted Approaches
Shipped Hatching Eggs
Eggs that survived the postal service deserve extra gentle handling. They’ve endured temperature fluctuations, rough jostling, and constant movement—any of which can damage the delicate air cell membranes or detach blood vessels before they’ve even entered the incubator.
Give shipped eggs at least 24 hours to settle and stabilize at room temperature before incubation. During this rest period, you can visually inspect for hairline cracks but avoid candling immediately. The air cell membranes need time to reattach and stabilize.
Begin your first candling on day 10 rather than day 7 for shipped eggs. This gives slower developers more time to show clear signs of viability while still allowing early removal of non-viable eggs.
Eggs Under a Broody Hen
Candling eggs under a broody hen requires timing and sometimes courage, depending on your hen’s temperament. Most broodies leave the nest briefly each day to eat, drink, and defecate—this is your window.
Work quickly during her absence, checking eggs and returning them before she returns. Some cooperative broodies will tolerate you gently reaching underneath them to candle, though this takes practice and a calm bird.
Aggressive broodies that peck viciously? Sometimes the stress isn’t worth it, and you’re better off letting nature take its course.

If you do candle under a broody, keep sessions extra brief—five minutes maximum. The hen’s body heat is even more critical than an incubator’s, and eggs cool faster without mechanical heating.
 Read the Ultimate Guide to Feeding Your Backyard Laying Hens for Maximum Egg Production
Dark-Shelled and Thick-Shelled Eggs
Some eggs simply resist candling no matter what you do. Chocolate Marans eggs, deep olive eggers, and any heavily speckled eggs can remain frustratingly opaque even with the best equipment.
Accept that you’ll see less detail. Focus on what you can observe—the air cell is usually visible even in very dark eggs, and that alone gives you valuable humidity feedback.
Sometimes you’ll catch just a hint of shadow or a subtle difference in opacity between the air cell end and the rest of the egg, suggesting development even if you can’t see details.
The sniff test becomes your primary tool for these eggs. Rotten eggs smell distinctly sulfurous and unpleasant, even through the shell, usually by day 10-12 if they’re going bad.
If an egg passes the smell test and weighs about the same or slightly more than at setting, leave it in and hope for the best.
 Discover Top Egg-Laying Chicken Breeds for Your Backyard Flock
Mistakes to Avoid
- Over-candling in the first week:
Those delicate blood vessels forming in days 3-7 are extremely fragile. Excessive handling and repeated temperature fluctuations during this critical window increase embryonic death.
Resist the temptation to check daily—wait until day seven for your first thorough inspection.
- Discarding eggs too quickly:
Unless you see a definite blood ring or the egg remains completely clear on day 10, err on the side of leaving questionable eggs in the incubator. Slow developers exist, especially with shipped eggs or those from young breeding stock.
- Opening the incubator after day 18:
This bears repeating because it’s so critical. Once you hit lockdown on day 18, the incubator stays closed until after the hatch is complete. Opening it drops humidity dramatically and can shrink-wrap chicks in their shells, preventing successful hatching.
- Forgetting to wash hands:
Eggshells are porous. Oils from your skin can clog pores and reduce oxygen exchange. Bacteria can penetrate the shell. A quick 20-second hand wash before handling eggs prevents these issues.
- Candling with dirty equipment:
If you spilled anything on your candler or it’s accumulated dust, clean it before use. Contaminants can transfer to eggs during the candling process.
Frequently Asked Questions
- Will candling hurt the developing chick?
The brief exposure to light and careful handling during candling doesn’t harm embryos. However, dropping eggs, excessive jostling, or keeping them out of the incubator too long can cause problems. Always be gentle and work efficiently.
- Can I see the heartbeat?
The heart begins beating on day two, but you typically won’t see it until days 4-6, and only in light-colored eggs with high-quality candlers.
By day seven, you should at least see the blood vessel network that indicates a functioning cardiovascular system, even if the specific heartbeat isn’t visible.
- What if my day 14 eggs look darker than the photos I’ve seen online?
Egg size, shell color, and candler quality all affect how much detail you can see. Larger eggs and darker shells appear more opaque.
As long as you can confirm the embryo is larger than at day seven, the air cell has grown, and you have no signs of death (blood rings, bad smell), trust that development is progressing.
- Should I mark the air cell on the shell?
Some hatchers mark the air cell boundary with a pencil at each candling session to visually track its growth. This can be helpful for learning proper humidity management, but it’s not necessary. If you do mark it, use pencil only—never markers.
- My egg is rocking or moving on its own in the incubator. Should I candle it?
No! Self-movement indicates the chick is positioning for hatch and may have already internally pipped. Leave it completely alone and resist the urge to peek. You’ll know what’s happening soon enough when you see the external pip break through.
Ready to Start Your Hatching Journey?
Now that you understand the ins and outs of candling eggs, you’re well-equipped to monitor your incubation with confidence. Remember that each hatch teaches you something new, and your skills will improve with experience.
Set up your candling station, mark your calendar for those key candling days, and get ready for the incredible experience of watching new life develop.
Whether you’re hatching chickens for your backyard flock, preserving heritage breeds, or simply experiencing the wonder of life unfolding, candling connects you to a process that’s both ancient and miraculous.
Happy hatching! I’d love to hear about your candling experiences and hatching success stories. Drop a comment below and share what worked for you – we’re all learning together in this amazing journey of bringing new life into the world.
source https://harvestsavvy.com/candling-eggs/





No comments:
Post a Comment